Installing kitchen cabinets is one of the most impactful home improvement projects you can undertake.
Whether you’re updating your kitchen or starting fresh, doing it yourself can save you money and give you a sense of accomplishment.

With the right tools and approach, this DIY project is entirely within your reach.
This guide is designed to walk you through each step, from planning to execution, ensuring a successful cabinet installation.
Whether you’re a first-timer or an experienced DIYer, you’ll find useful tips and expert advice to help you achieve a professional result with ease.
Preparation & Planning
Before starting your kitchen cabinet installation, a solid plan is essential for success.
Understanding the Layout
Start by mapping out your kitchen layout.
Measure carefully and decide where high cabinets, base cabinets, wall cabinets, and islands will go.
Make sure to account for appliances, sinks, and the overall flow of the kitchen.
A detailed design plan is your roadmap to avoid mistakes later.
Sorting Materials & Hardware
Organize your materials by sections—base cabinets, wall cabinets, high cabinets, islands and accessories.
Unpack each piece and set aside the boards for cabinet bodies and drawers.
For easier assembly, arrange drawer sides in order as suggested by customer-provided content.
Essential Tools & Supplies
You’ll need some basic tools:
- Tape measure (for accurate measurements)
- Hand drill (for pilot holes and screws)
- Level (to keep everything straight)
- Pen/pencil (for marking measurements)
- Knife (for cutting packaging)
- Rubber mallet (to gently tap parts into place)
Step 1: Unpacking and Preparing the Materials
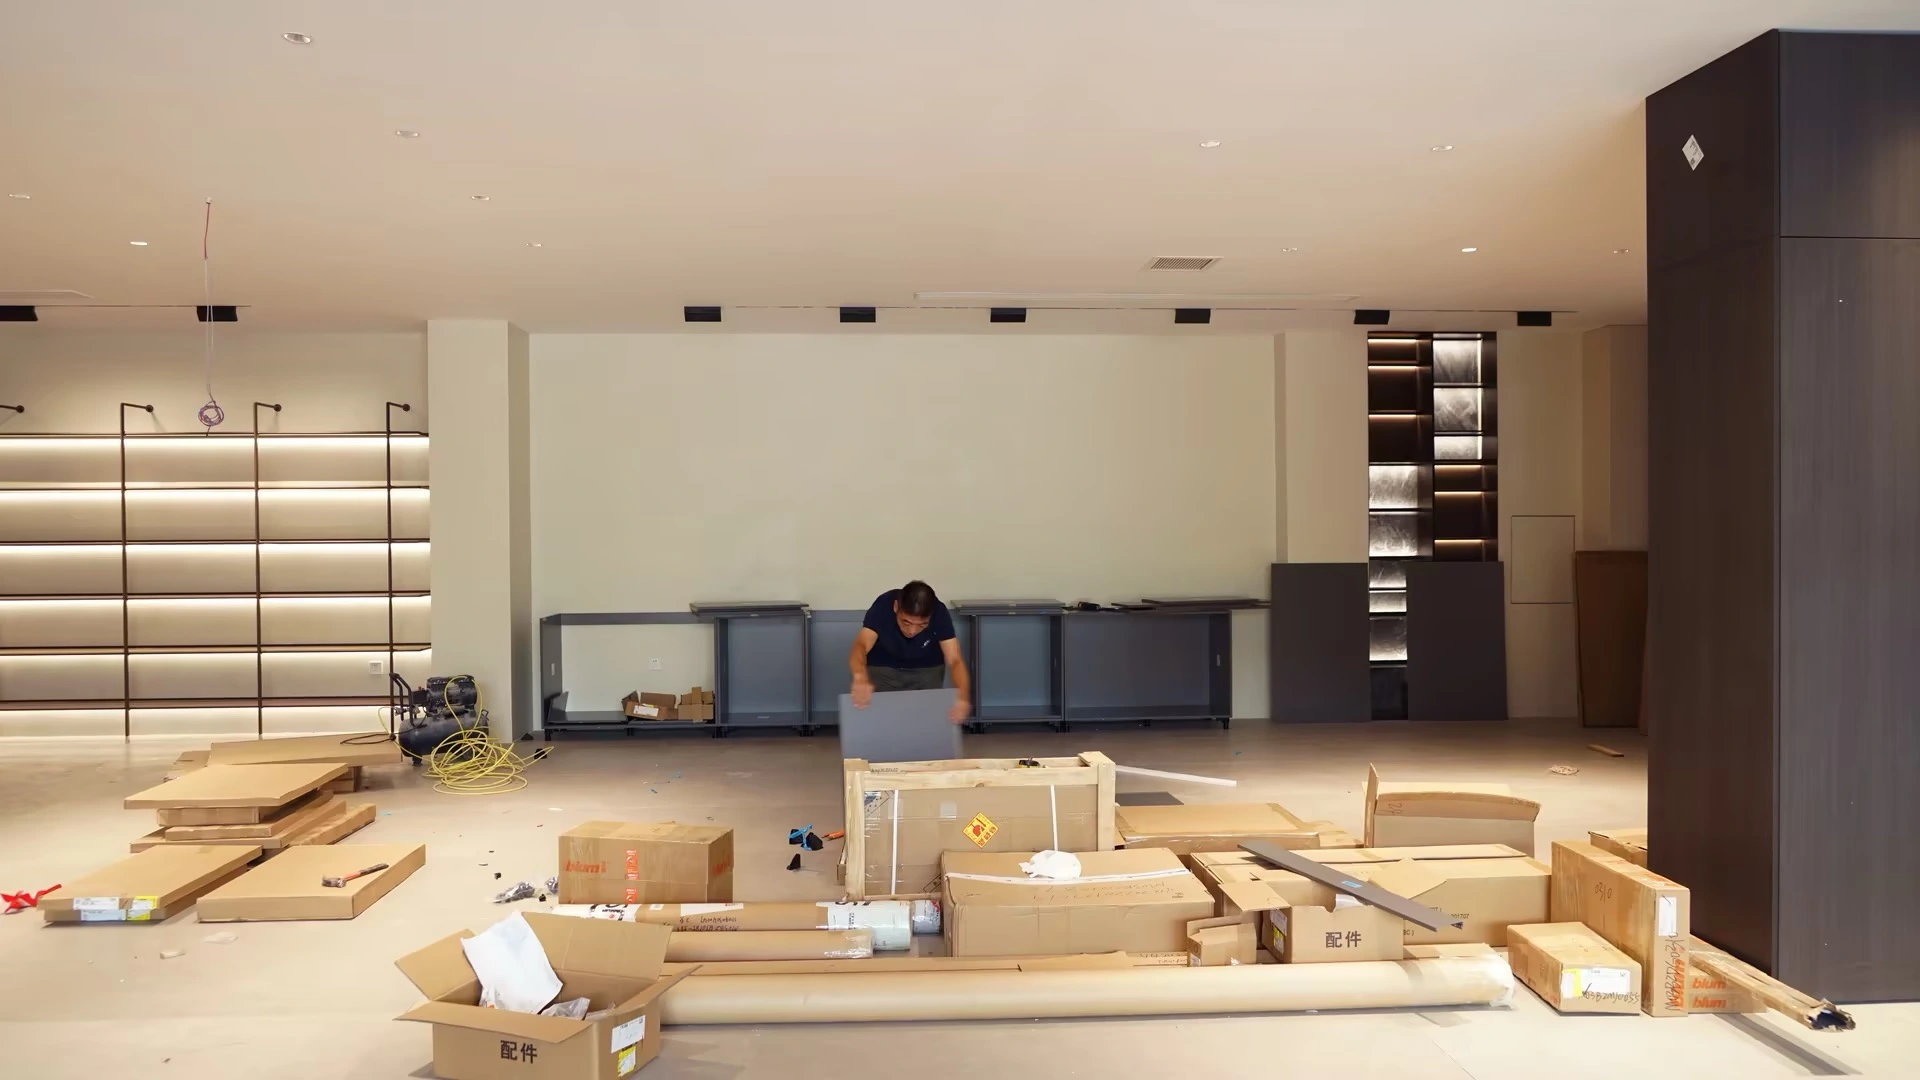
Before diving into your kitchen cabinet installation, unpack and inspect all the parts carefully.
Begin by unboxing the materials and checking for any damage, like cracks or scratches, especially on the panels and doors.
Once everything looks good, lay the pieces out on a clean, spacious area to ensure you have all the parts.
Organize them by type—separate the boards for the cabinet body from the drawer materials.
This way, you’ll have a clear overview of what you’re working with and can easily grab the right pieces when needed.
A crucial part of preparation is performing a trial assembly.
Lay out all parts based on your cabinet design plan, checking for correct alignment and fit.
It’s also a great time to double-check the dimensions and ensure all the pieces match the instructions.
This step helps identify any potential issues early on, saving time and preventing frustration later.
Pre-assembly lets you get comfortable with the parts, ensures everything is in its place, and helps you get a sense of the overall project before you start putting things together.
Step 2: Assembling the Cabinet Body
Now it’s time to start assembling the cabinet body.
Begin by attaching the side panels to the back panel.
This is a key step in creating a sturdy structure, so make sure each piece is aligned properly and secured tightly.
After attaching the sides, move on to the base, carefully positioning it and securing it to the side and back panels.
When fastening, use screws that are appropriate for the material and ensure they are evenly spaced for maximum stability.
Drawer tracks play a big role in smooth operation, so take time to install them correctly.
Align the tracks on the sides of the drawer boxes, then secure them in place, making sure they’re straight.
Drawer tracks should glide effortlessly, so if they’re installed wrong, it can cause friction or jamming.
Customer-provided advice suggests arranging all the drawer parts first—organizing them in an accessible order for easy assembly.
For a smooth assembly process, use clamps to hold pieces together as you drill.
This will prevent shifting during the process and give you a secure hold.
After each step, take a moment to check alignment and level, ensuring everything is coming together properly. These simple steps and attention to detail will set you up for success as the cabinet body takes shape.
Step 3: Installing the Upper Cabinets

Installing upper cabinets requires careful planning to get them level and securely mounted.
Start by measuring the area where the cabinets will go.
It’s best to begin marking from the highest point on the floor to ensure the cabinets are installed level.
Use a pencil to mark a level line on the wall, which will act as your guide for all upper cabinet placements.
Make sure to measure twice and mark where the studs are located, as these will provide the best anchor points for your cabinets.
Once your marks are in place, position the upper cabinets carefully.
Start with the corner unit to act as an anchor for the rest of the installation.
With the cabinet in place, drill pilot holes and secure the unit to the studs using screws.
For extra stability, insert shims behind the cabinet if necessary to ensure it sits flush against the wall and remains level.
Expert Tip: To make this step easier, consider using a ledger board.
A ledger board is a temporary support that holds the upper cabinets in place while you secure them.
This avoids leaning over the lower cabinets and ensures everything is level during installation.
By carefully measuring, securing with screws, and using a ledger board, you’ll ensure your upper cabinets are securely mounted and ready for the next step of the installation.
Step 4: Installing Base Cabinets

Installing base cabinets is a critical part of the kitchen assembly process.
Begin by aligning your base cabinets along the wall where they will be installed.
Make sure to mark the cabinet locations on the wall, ensuring they are aligned with your design plan.
As a helpful tip, customer-provided advice recommends using furring strips, which are thin strips of wood that help keep the cabinets level when securing them to the wall.
This can be especially helpful if your wall isn’t perfectly straight, as it helps make up for any gaps and keeps everything aligned.
Once the cabinets are aligned, it’s time to secure them to the wall.
Use screws to attach the cabinets to the studs in the wall, ensuring they’re evenly spaced for support.
As you drill, make sure the cabinets are perfectly level—use a level tool for accuracy.
It’s crucial to check the alignment frequently to avoid crooked or unstable cabinets.
Important Considerations: While securing the base cabinets, think about plumbing and appliance clearances.
Ensure there’s enough space for pipes and wires if necessary.
Additionally, keep the cabinet doors aligned properly to ensure they open and close smoothly.
Once your base cabinets are securely installed and leveled, you’ll have a solid foundation for your entire kitchen layout.
Step 5: Installing and Securing Drawer Boxes
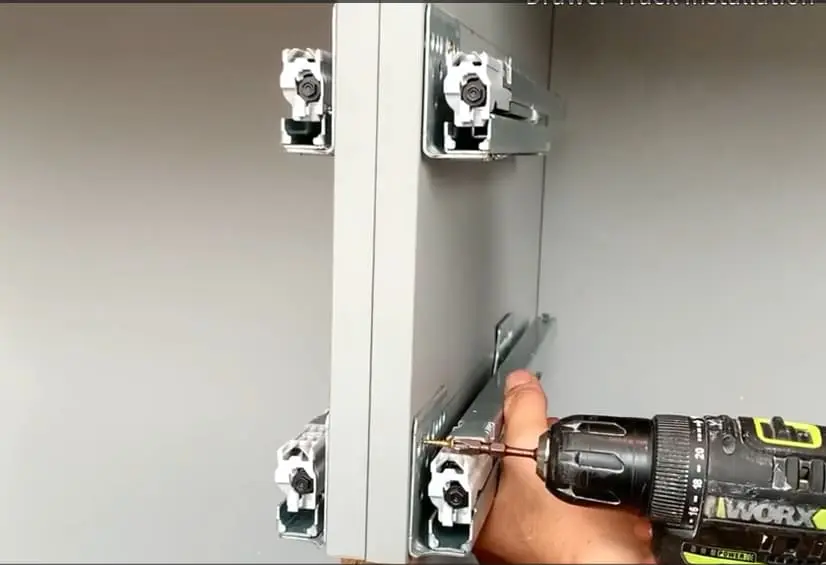
Once the cabinet body is complete, it’s time to install the drawer boxes.
Begin by aligning the drawer tracks with the sides of the cabinet body.
Carefully slide the tracks into place and ensure they are level and securely fastened.
Some cabinet designs may require you to attach the drawer box to the rails before fitting the track, so be sure to follow your instructions for your specific model.
When securing the drawer boxes, ensure they are aligned properly with the opening and that the tracks are installed evenly on both sides.
This is crucial for ensuring smooth drawer movement.
If the tracks or glides are off by just a little, it can cause the drawers to stick, jam, or fail to open fully.
For smooth operation, it’s important that the tracks are parallel and aligned with the cabinet body.
Tip for Smooth Operation: Ensure all glides are aligned correctly and that the drawer boxes are fully seated before securing them.
Test the drawers by sliding them in and out to check for smoothness.
If they don’t glide easily, double-check the alignment and make any necessary adjustments.
Before fully securing the drawer boxes, recheck the dimensions to make sure everything fits properly.
If you skip this step, you may face issues later when closing the drawers.
A final dimension check ensures that all parts align perfectly, preventing unnecessary adjustments later.
Step 6: Final Cabinet Assembly & Adjustments

After installing the drawer boxes, it’s time to secure the adjacent cabinets together.
Use screws to attach the cabinets to one another, making sure the sides are aligned and level.
You can use clamps to hold the cabinets in place while securing them, ensuring they don’t shift out of alignment during this process.
Double-check the alignment before tightening the screws completely to ensure everything is flush and secure.
Next, focus on adjusting the cabinet doors.
If the doors are not aligned properly, they can look uneven and affect the overall appearance of your kitchen.
Start by adjusting the hinges.
Many cabinet doors come with adjustable hinges, allowing you to move the door up or down, side to side, and forward or backward.
It’s a good idea to start with small adjustments to find the best fit.
Customer-Provided Content: It’s important to note that trial fitting the door panels at this stage may not be necessary.
Instead, recheck the cabinet dimensions once more to confirm that everything is in place.
Ensuring the cabinet body is square and level before attaching doors will save you from dealing with misaligned doors later on.
Before moving on to the final touches, perform some final checks for level, alignment, and spacing.
Verify that all cabinets and doors line up correctly and are installed securely.
This ensures a polished, professional finish and eliminates any issues that could affect the functionality of your cabinets.
Step 7: Installing the Cabinet Doors and Hardware

Installing the cabinet doors is a key step in the installation process.
Start by aligning the doors with the cabinet frame and attaching them using the provided hinges.
Ensure that each door is level and aligned with the surrounding cabinets for a clean, uniform look.
When attaching the doors, it’s important to adjust the hinge positions to ensure they open and close smoothly.
Tighten the screws gradually to avoid overtightening and warping the doors.
Once the doors are in place, move on to installing the cabinet pulls or handles.
Start by marking the location of the handles on each door.
The best method for marking is to measure the height of the handles from the top or bottom of the door and ensure they are evenly spaced.
Once marked, use a drill to create pilot holes for the screws, then secure the handles in place.
Finishing Touches: After the doors and handles are installed, you can add trim for a polished, professional look.
If your cabinets require a protective finish, such as stain or polyurethane, apply it now.
Make sure to follow the manufacturer’s instructions for applying and curing the finish to achieve the best results.
Step 8: Final Adjustments and Cleaning
After everything is installed, it’s time for the final adjustments.
Begin by adjusting the drawer fronts and cabinet doors to ensure they line up properly with the cabinet frames.
This may involve small tweaks to the hinges or tracks to achieve a smooth, consistent alignment.
Make sure that all doors open and close without resistance and that the drawers slide easily.
Cleaning the Installation Area: Once the adjustments are made, it’s time to clean up.
Remove any protective tape from the cabinets, and wipe down all surfaces to remove dust, debris, or fingerprints.
A clean workspace not only makes your kitchen look better but also ensures that no stray materials are left behind.
Finally, tidy up the area to leave it looking neat and ready for use.
By following these final steps, you’ll ensure your kitchen cabinets are not only installed securely but also function perfectly and look great!
Conclusion

Installing your own kitchen cabinets is a rewarding DIY project that requires patience and attention to detail.
By following each step carefully and taking your time, you’ll ensure a smooth and successful installation.
Proper preparation is key to achieving professional results.
Ready to take the next step?
Download our comprehensive installation guide PDF for additional tips and tricks, or check out our assembly videos for a more detailed walkthrough.
These resources will help you make sure every step of your installation is done right!
FAQ: Kitchen Cabinet Installation
1. What is the average cost to install kitchen cabinets?
The average cost to install kitchen cabinets varies depending on your location, the complexity of the project, and the type of cabinets you choose. Based on data from HomeAdvisor, the average cost is about $6,006. Other sources, like HomeGuide, estimate costs ranging from $4,500 to $15,000, while Fixr reports an average of $7,500. Costs can increase for custom cabinets or complex layouts.
2. Can I install kitchen cabinets myself?
Yes, you can! Installing kitchen cabinets is a doable DIY project if you have basic skills with a level and a drill. While it might take a bit longer than hiring a professional, many homeowners successfully install their own cabinets. You’ll find plenty of video tutorials online that can guide you through the process step-by-step. Just be sure to plan carefully and follow instructions for precise measurements and alignment.
3. Why is cabinet installation so expensive?
Cabinet installation can be expensive because it requires expertise to ensure that the cabinets are level, doors open smoothly, and the cabinets last for years. Skilled contractors are able to avoid costly mistakes that could arise from improper installation. Labor costs are high because it takes knowledge, precision, and time to install kitchen cabinets correctly. This is why many homeowners choose to hire professionals instead of going the DIY route.







 English
  Italian
  French
  German
  Spanish
  Portuguese
  Japanese
  Korean
  Russian
  Arabic
  Thai
Thai  Chinese